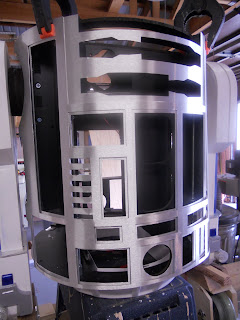


On Thursday, my dad was away, so I worked on the aluminum skins alone.
These skins have been sitting in my basement for nearly a year. They were a Christmas present and, like so many other builders, I had been delaying any work with them until I was certain of what I was doing.
There are several things that need to be done:
- Mark the skins and the panels so I don't lose track of what goes where.
- Separate the panels from the skins.
- Since the panels are attached with tabs, the leftover tabs need to be filed away.
- The panels and skins need some sanding and cleaning in preparation for painting.
- The panels and skins need to be primed and painted.
- I'm using skins snaps from Darren Murrer, so the snaps need to be attached to the inner skin sections and to the frame.
- Attach the inner skins to the outer skins. I plan to use VHB tape.
I'm basically copying Chris James, Paul and RedUFO in handling these skins. Chris either came up with or was the first to popularize the technique of using a chisel to break out the panels rather than risk using a hacksaw.
I had about three hours before work Thursday and took my time: My goal wasn't to finish a certain portion but rather to work at exactly the speed I needed to be confident of quality work. I finished the cutouts, filing and some basic sanding on the inner front skin and the cutouts and filing on the outer skin. I still need to file the outer skin panels, sand everything, clean, prime and paint.
Here are photos of my progress. They'll be put into order and captioned (or "cutlined," as I would say in the newsroom) once I get back from the Cranberry Festival and the "Phantom of the Opera" screening today:


